Do you ever get in your car after a hot summer day and it’s like stepping inside an oven?
You switch on the air conditioner expecting a soothing cool breeze but instead, all you hear is this weird hissing noise as the AC starts up.
Don’t worry – we understand how intimidating it can be when something goes wrong with your car’s air conditioning unit.
So, we’re here to explain what might be causing that hissing sound and tell you how to fix this problem before it becomes an even bigger problem down the road.
Hissing Noise On A Car Air Conditioner
The hissing noise you’re hearing from your car’s air conditioner could be the result of a few different issues.
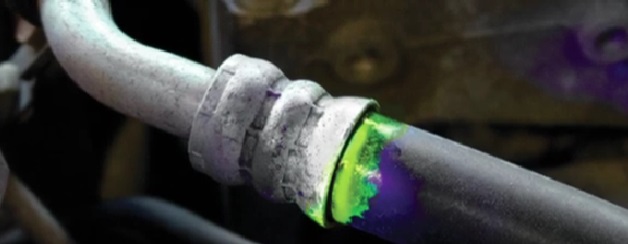
Most commonly, this sound is the result of refrigerant escaping through a small leak in the AC system.
The refrigerant is pressurized, and when it finds a hole to escape, it results in a hissing sound.
In addition to leaks, the hissing could be caused by the normal operation of the AC’s expansion valve as it regulates the refrigerant.
If your car’s AC is still cooling effectively and the hissing sound is not accompanied by other symptoms, this might be the case.
However, if the hissing is followed by a noticeable decline in cooling efficiency, it’s recommended to have your AC checked by a professional to determine the exact cause and prevent further damage.
What Causes A Hissing Sound From Your Car Air Conditioner?
There are several potential causes for a hissing sound from your car’s air conditioner. The most common is a leak in the AC system.
Refrigerant leak:
As mentioned earlier, a refrigerant leak is often the culprit behind the hissing noise.

This can happen due to wear and tear on the AC system over time or from damage caused by debris or road hazards.
Clogged expansion valve:
The expansion valve in your car’s air conditioner controls the flow of refrigerant to the evaporator.
If it becomes clogged or stuck, it can cause a hissing noise when the AC is running.
Dirty evaporator coil:
The evaporator coil in your car’s AC system helps cool down the air before it enters your car’s cabin.
If this coil gets dirty or clogged, it can create a hissing sound as the refrigerant moves through it.
Loose or damaged hoses:
The AC system in your car has several hoses that carry refrigerant and regulate pressure.
If any of these hoses become loose or damaged, it can result in a hissing noise.
Common Fixes To Repair The Hissing Sound On Your Car Air Conditioner
1. Check for leaks and repair them:
If you suspect a refrigerant leak is causing the hissing noise, it’s best to have a professional inspect and repair the leak.
Adding more refrigerant without fixing the leak will only result in more damage to your AC system.
2. Clean or replace the expansion valve and evaporator coil:
If these components are found to be clogged or dirty, they can be cleaned or replaced to help improve the efficiency of your car’s AC system.
3. Tighten or replace damaged hoses:

If loose or damaged hoses are causing the hissing noise, they can be tightened or replaced by a professional technician.
When To Take Your Car In For Professional Service
When it comes to your car’s air conditioner, it’s best to err on the side of caution.
If you notice the hissing noise persisting even after trying suggested fixes, or if the sound is accompanied by other symptoms such as reduced cooling efficiency, unpleasant odors, or visible signs of leaks, it’s time to consult a professional.
Regular maintenance checks are always a good idea to help prevent problems from escalating down the line.
However, if your AC system begins showing signs of malfunction between these checks, it’s wise to take your car in for a professional service.
Some issues can be complex and attempting to fix them without proper knowledge can lead to further damage.
A certified technician will have the expertise and tools to accurately diagnose and rectify the problem, ensuring your car’s AC system runs smoothly and effectively.
In short, it’s important to have your car’s air conditioning system regularly maintained and inspected to prevent any major issues from occurring.
Keeping an eye and ear out for any unusual noises can help you catch and fix problems early on, saving you time and money in the long run.
Don’t ignore that hissing sound – get it checked out before it becomes a bigger problem.